Motor Vehicle Community Forums:
http://www.chemicalsubjects.com/forums/viewforum.php?f=220
Saturday, 21 June 2014
Motor Vehicle Community
Saturday, 17 April 2010
The symptoms or: Trouble Shooting
The controller starts by the lack of suitable data "to behave funny. (Humor who can laugh at such jokes about) most often jokes comment on this non-circular, or to a high idle, spontaneous death of the motor, buck, stuttering, misfiring, popping in the air filter housing, poor throttle response in low etc. pp. He also flooded usually hopelessly in which soot cloud from the exhaust and high fuel consumption while poorer performance leads to.
If you now conduct your minis in the list find again that would be the vacuum hoses a very hot tip.
What breaks?
It is mostly tips, the hoses and tear or by the ever-hot environment caused by old age begin to crumble. The hoses themselves are too brittle to get holes / cracks or already rendered unusable by kinks. If no external damages are, there remains the possibility that they are blocked simply expand (if working with compressed air will blow out completely before the tubes!). The hoses are flexible, although limited, but not rubber - that is to carefully work around unfortunately. In rare cases, the case of petrol leaking or overflowing offender, except to say, eight have not. If it is filled with gasoline, it can be expanded and freigeschüttelt. This requires quite a bit of patience.
The "hierarchy"
Let's get the yellow hose to the snorkel. It connects the valve with the ThermAC ThermAC switch. The valve is used during a cold start to the fact that as soon as possible to the engine block pre-heated by air drawn in is to rapidly provide proper exhaust emissions. How the switch works exactly, I do not know, but I think it can, depending on the temperature (should be a bi-metal switch) be something of the pressure valve in the snorkel through to fill this order - if necessary. The switch should operate in both directions, Wierum the hoses are connected not have to worry. (If not please contradict! Bin as well versed soo not.)
ThermAC switch from the red hose goes to the intake manifold. (Photos from the engine coming soon. As long as simply hope that the old bottles are still there to hinzuhangeln around.)
From there is the short hose (in black / white) for connection to the gas trap. The petrol is the case, held by a bracket on the fire wall (separation between the engine and passenger compartment) to the left / behind the air box. Remove the Lufi best, makes it easier to work a lot easier.
The connections are designed so that a "reversed polarity" is almost impossible (but "is not" is not, therefore, to note that the management ECU ran to the green connector to be! ). The long, green-coded cable leads for connection to the underside of the ECU next to the connector of the engine wiring harness.
Wednesday, 14 April 2010
Vacuum system : The Basics
First of all, we want function of the hoses in connection with the gasoline case to clarify the answer to, to what the junk ever need.
The SPI (Single Point Injection) has, like all current electronic fuel injection systems a MAP sensor. MAP stands for Manifold Absolute Pressure, ie, here is the pressure measured in the intake manifold. Why? This sensor gives the controller information about the current load of the engine, thus allowing among other things, the correct calculation of the appropriate ignition timing, the different load ranges vary lie down in need.
Since this is an Alpha-N system is at (racing friends will now sensitive) , is calculated as the injection quantity and injection from the position of the throttle, the engine speed and intake air temperature.
The MAP sensor is located in SPI-Minis directly in the ECU, because the very nature of the fuel injection (TBI: Throttle Body Injection = port fuel injection) is not possible to accommodate him directly in the intake manifold. when the throttle valve fuel injected centrally SPI is as before, petrol would come in contact with the sensor (petrol vapor, condensed fuel) and are destroyed, etc.. For this reason, he sits outside and is a vacuum tube system with measurable power from. But because the hoses still drops way in sensor could go towards gas, gasoline case, the interposed. it collects in the gas, the short vacuum hose from the intake manifold can get her through the.
I sometimes got NEN experimental setup done on the desktop, just as conveniently all hoses including case there are new. We therefore assume that control of the experimental Minis PalmPowered is that a radiator intake manifold and the air intake tube has a infrared remote control is one of mime.
Sunday, 18 October 2009
Car Care and Service Manual
Do-it-yourself servicing and maintenance for practical owners
The object of this website is not just to record what must be done and when to do it;a manufacturer's handsite does that quite adequately.
Here, in addition to the usual maintenance details, an attempt is made to explain the "whys" and "wherefores" of the various jobs not only for the benefit of the comparative novice but also for the fairly experienced owner who is likely to tackle such work as decarbonizing and valve-grinding, brake-relining or attentions to the carburettor and ignition system, which do not call for the use of expensive service tools or equipment.
The average handbook either ignores these jobs or dismisses them somewhat arbitrarily as the province of the local dealer which can be infuriating to a practical owner who possesses a reasonable range of hand tools and the ability to follow straightforward instructions!
A chapter has been added which deals, in addition to strictly practical matters, with engine tuning kits and some worthwhile accessories subjects which are likely, sooner or later, to engage the attention of any enthusiast.
Thanks are due to B.L.M.C. and to a number of other firms that have supplied information and illustrations, and in particular to Mr. David Lambert, of Lambert's Garage, St. Osyth, for providing facilities for taking the majority of the photographs actually "on the job."
Getting to know your car
When the Austin Seven and Morris Mini-Minor were introduced in 1959, after eight years of design and development, they caused a sensation in the motoring world for the new B.M.C. Minis bristled with unconventional ideas, but were nevertheless essentially practical in conception. Soon the original Austin and Morris Minis were joined by the Wolseley Hornet and the Riley Elf, together with the redoubtable Cooper and Cooper "S" versions which immediately established themselves as giant-killers in the racing and competition worlds.
In October 1967 came the Mini "1000" Mark II models, with 998 c.c. engines, and in October 1969, ten years and two million Minis after the introduction of the original cars, the more refined and comfortable Clubman and 1275 GT models. These were followed, in November 1969, by two new "basic" Minis—the 850 and the 1000—which retained the old bodyshell but incorporated the wind-up windows, concealed hinges and the negative-earth electric system of the Clubman.
The Mini 850, 1000, Clubman, Clubman Estate, 1275 GT and the Cooper "S" therefore comprised the complete Mini range, the Austin, Morris, Wolseley and Riley variants being discontinued and the cars being known simply as Minis in their own right.
To what do the Minis owe their astonishing success? It was their designer, Alec Issigonis, who best summed it up when he remarked, in effect, "We have deliberately made the cars very small outside, because we have found new ways of making them very large inside."
How was this done, and how does it affect the owner who proposes to carry out as much maintenance as possible in the home garage? First, there is the arrangement of the combined engine and transmission unit transversely across the front of the car. Besides saving a great deal of space, this has rendered all the usual items that require attention (except possibly the ignition distributor) unusually accessible; the owner should have no difficulty in carrying out normal adjustments and all work short of a major overhaul (which calls for removal of the engine).
Admittedly the ignition equipment, being mounted at the front of the engine without protection from a radiator, is liable, on earlier models, to be swamped by a bow wave if a water-splash is negotiated too enthusiastically, and cutting-out of the ignition can also occur when driving in heavy rain. Simple methods of waterproofing the ignition system are, however, discussed in Chapter 7. The engine and transmission assembly share a common supply of oil. Instead of having to check and top-up three oil levels, the work is confined to checking the level on the usual engine dipstick and adding fresh oil through the filler on the valve cover. A similar saving in time and trouble applies, of course, when it is necessary to drain the oil.
Notice, also, that air is forced through the side-mounted radiator from the engine side, emerging by way of the nearside wheel arch, which means that the engine is not surrounded by preheated air .The technically-minded reader will appreciate that this might lead to carburettor icing in cold weather but will note that this can be taken care of, on most models, by positioning the inlet to the air cleaner close to the exhaust manifold. A pre-heated air intake does, of course, result in the loss of a small amount of power under full-throttle conditions, but this is more than compensated for by improved flexibility and better fuel consumption over a wide range of running conditions and in hot weather the intake can be swung away from the manifold.
Again there is evidence of the combination of technical and practical considerations in the use of hollow rubber cones as suspension units instead of steel coil or leaf springs. Rubber springs not only have excellent self-damping properties, giving a particularly good "ride," but require no lubrication and cannot develop squeaks or broken leaves! The Hydro-lastic suspension fitted to later cars, which is described in Chapter 9, takes the principle a stage further by interconnecting the front and rear suspension units, giving a level, pitch-free ride that is outstanding for such a small vehicle.
One could continue to point out examples of the way in which technical advantages have been combined with practical features throughout the car. It is necessary, however, to turn now to a brief description of the functioning of the various instruments and controls, followed by notes on the handling characteristics of the various models. The information is intended mainly for the benefit of an owner who is anxious to get the best from his car; it does not come into the category of elementary driving instruction, as this is a subject which is obviously the province of a fully-qualified instructor.
Towing the Car
The car should never be towed with the front wheels on the ground if a transmission fault is suspected. Garage assistance should be obtained as it is necessary to lift the front end of the vehicle on a suitable towing rig. In other cases the car can be towed normally but the selector must be at N and the ignition should, of course, be switched off.
Emergency Starting
If the battery has insufficient charge to turn the engine over with the starter motor but is providing sufficient current to operate the ignition system, it is not possible to start the car in the usual way by enlisting the aid of friends to push it at a relatively low speed with top gear engaged, since the slip in the torque converter will be1 sufficient to prevent the engine rotating. It will be necessary to tow the car at a speed of about 20 m.p.h. before the transmission will drive the engine. If this can be done, the drill is to set the mixture control, if necessary, switch on the ignition and select second gear manually when a speed of 20 m.p.h. is reached. Then depress the accelerator sufficiently to enable the engine to start. If the engine is new and has not completed its running-in period, however, a road speed of about 30 m.p.h. must be reached and D must be selected.
The Automatic-transmission Models
The automatic transmission which is available on the Austin and Morris Minis provides two-pedal, fully-automatic motoring or complete manual control of the gears, at the choice of the driver. It is particularly well suited to the Mini, since it gives four gear ratios instead of the two or three provided by most other types of automatic transmission. A hydraulic torque converter replaces the clutch and ensures a very smooth take-up of the drive from a standstill and when changing gear.
Driving the "automatic" Mini is delightfully simple if the gear lever is moved to the D position, after starting the engine with the lever at N (an automatic cut-out ensures that the starter mechanism can operate only when the selector is at Neutral). With D or Drive engaged, the trans-mission will change up at speeds which depend on the amount of throttle opening, but the maximum engine revs are limited by a governor in the transmission to the equivalent of about 22 m.p.h. in first gear, 34 m.p.h, in second, and 50 m.p.h. in third.
When maximum acceleration is required, a "kick-down" switch which comes into action at the extreme limit of the throttle-pedal travel will engage the next lowest gear, the maximum speed limits for a kick-down change being approximately 17, 28 and 40 m.p.h. in first, second and third gears respectively.
Probably the most attractive feature of the transmission for the keen driver, however, is the fact that downward changes can be made instantly and very smoothly simply by moving the gear lever to the appropriate position. A "zig-zag" between the second and third gear positions acts as a stop when changing from top to third, preventing accidental engage¬ment of second gear, which might over-speed the engine. The main point to remember, in fact, when controlling the gearbox manually, is not to change down at a road speed which is above the safe engine speed for the next lowest gear. The limits are 50 m.p.h. in third gear and 40 m.p.h. in second gear.
The third feature of the transmission is that any gear can be selected and retained—even top gear when starting from rest. The torque con¬verter will take up the drive smoothly and progressively and the car can be allowed to glide along quietly in traffic, without excessive gear changing and high engine revs. Since the kick-down is operative only when the lever is at D, full throttle can be used without causing a downward change when any of the other gear positions has been selected.
It will be seen that both the beginner and the enthusiast are admirably catered for by this transmission and if you are contemplating the purchase of a used model the higher cost of an "automatic" Mini would probably be more than justified.
Steering and Roadholding
Expert drivers were quick to appreciate the light, precise steering and the excellent roadholding of these little cars, qualities which were subsequently demonstrated in many international road rallies, races and similar competitive events. Unlike many modern

Fig. 6. The Clubman Estate continues the popular series of Mini estate cars
cars, they should maintain an equal standard of stability when driven fast in gusty side winds.
Any lack of precision in the steering, or tendency to wander, therefore, calls for investigation. Similarly, instability when cornering fast or when the car is driven over a pot-holed surface at speed (the all-independent suspension normally deals exceptionally well even with atrocious road surfaces) suggests that the shock absorbers have weakened and are due for replacement.
A word of caution is, perhaps, advisable in the case of the estate car and van. The urge to forge ahead at too high a speed on rough tracks should be curbed if a full load is being carried, owing to the risk of the underside of the car bottoming on bumpy surfaces. This does not imply, of course, that the ground clearance is inadequate. At about 6£ inches (with the car laden) it compares favourably with many much larger models. A further point is that the disposition of the load can affect the handling qualities. It should be arranged as far forward as possible, since a tail-heavy car will develop an over-steering characteristic—a term which simply means that the tail will tend to swing outwards if corners are taken fast.
Braking System. The powerful and progressive Lockheed hydraulic brakes contribute to the excellent average speeds that can be put up during the course of a fast cross-country run when the car is being really hurried. Ordinarily, of course, it is bad practice to "drive on the brakes." When in good condition the brakes should call for only light pedal pressure during normal braking and moderately firm pressure to obtain maximum retardation, when the car should pull up all-square. The latter characteristic should be retained when the brakes become really hot through frequent use, and the travel of the brake pedal should not increase appreciably; in other words, the brakes are not prone to "fade" and if this symptom is detected, it is probable that incorrect linings have been fitted to the shoes at some time, or that the braking system as a whole requires a complete overhaul, as described in Chapter 10.
Assessing Performance and Fuel Consumption
Few subjects are more likely to provoke argument among rival owners than claims in respect of maximum and average speeds and m.p.g. figures. The only practical course is to tabulate some average figures which should be within the capabilities of a car that is in tip-top condition and on which the ignition and carburettor settings have been adjusted to a nicety, as described in other chapters of this book. These will be found in the Appendix.
In published road tests one often sees the 0 to 50 m.p.h. or 0 to 60 m.p.h. time quoted as a basis for comparison; but to obtain a really low figure in a standing-start test entails quite brutal engagement of the clutch at high engine revs and "snatching" of the gear changes—treatment which competition drivers accept as inevitable but which a considerate owner would hesitate to adopt. A less drastic test, and one which will give a reliable picture of the overall efficiency of the car, is to time the acceleration in third and top gears, from, say 20 to 40 m.p.h. or from 30 to 50 m.p.h.
As one would expect, a small car is appreciably livelier when only the driver is on board, as compared with a full load of passengers and holiday luggage. As a compromise, therefore, the figures given on page 147 relate to the performance that can be expected when a driver and one passenger are carried; the same applies in the case of the van, when it seems logical to assess the performance of this vehicle when carrying about half its maximum load.
The maximum speeds quoted for the indirect gears are the ultimate that can be reached, as opposed to the rather lower speeds at which one would normally change up during ordinary driving. Their chief value is an occasional check on engine condition; if the maximum obtainable in, say, second gear, falls appreciably short of the figure quoted, it is logical to suspect weak valve springs, sticking or burnt valves, retarded ignition timing or inefficient sparking plugs—faults which can be present even when an engine is otherwise in good mechanical condition and which can, fortunately, be put right quite easily by a practical owner.
Two further points deserve mention, before leaving the subject of performance. In the first place, the true maximum speed is always difficult to assess accurately. The best plan is to take the average of a series of runs in both directions over the same stretch of road, in order to cancel out the effects of wind and gradient. It is even more difficult to arrive at a true assessment of fuel consumption, as this can vary by as much as 5 m.p.g. below or 10 m.p.g. above the figures quoted, depending on road and traffic conditions, the load carried, the tyre pressures and the manner in which the car is driven.
Under most conditions, the car behaves quite well on ''mixture" grades of petrol, premium grades being an unnecessary luxury except during long, fairly fast runs in hot weather and when the car is heavily laden. The better grade of fuel will then tend to suppress any "pinking." If a "regular" grade must be used, an alternative ignition distributor is available which has a modified ignition-advance curve.
The Minis On The Road
We can now turn to an assessment of the road manners and handling characteristics of the cars or vans, mainly for the benefit of a driver who has no previous experience of these models and therefore lacks a yardstick by which to judge the performance of a particular car perhaps a used example that he has just purchased or is intending to put through a fairly comprehensive road test.
The points that will be emphasized are those that will give a fairly reliable indication of its general mechanical condition. It is impossible, of course, to lay down hard-and-fast standards, as so much will depend on the mileage that has been covered since new or since an overhaul was carried out. A certain amount of latitude must therefore be allowed, but it should also be remembered that, initially, these cars set a very high standard and will amply repay any work put in by a keen and conscientious owner.
The engine should be smooth and quiet, apart from a certain amount of "buzz" from the cooling fan as the speed rises, and a noticeable but not un¬pleasant whine from the constant-mesh gears that convey the drive from the engine to the gearbox, which are always in action, even when top gear is engaged (for details of a really worthwhile sound-damping kit, see Chapter 12).
Drivers of earlier models often criticized the gearchange on the score of stiffness in action, particularly "across the gate" between second and third gears. This tended to wear off, or at least become less noticeable, as the mileage mounted, and the change was, in addition, noticeably improved on later cars. As with many popular cars, difficulty is sometimes experi¬enced in engaging first gear when the car is at rest and as this gear is not synchronized on earlier cars, the double-declutching technique must be used when changing from second to bottom gear with the car on the move. In other words, the clutch must be momentarily engaged when the gear lever has been slipped into neutral, the engine at the same time being accelerated to synchronize the gears; the clutch is then depressed and the gear lever moved into the first-gear position.
The experienced driver will probably double-declutch even when changing between the upper ratios, since the synchromesh is not very powerful and can be overcome even when making moderately slow changes.
The baulk-ring synchromesh gearbox fitted to later models, however, was a great improvement and eliminated most of the complaints associated with earlier cars. Modifications to the remote-control gearchange on earlier Cooper models also cured the irritating rattle that developed at certain engine speeds, but as the nylon cup incorporated in the ball-and-

Fig. 5. The Austin Mini Countryman Mark II, counterpart of the Morris Mini Traveller
socket of the lever on later cars wears, the rattle can recur. The simple cure is to remove the gear lever and fit a second spring inside the existing spring. This will make gearchanging a little stiffer but will save a great deal of wear and tear on the driver's nerves!
While on the subject of troubles which develop in early Minis, the tendency to frequent breakage of the exhaust pipe cannot be overlooked. Owing to the design of the exhaust system, the pipe absorbs a considerable amount of the engine torque reaction, as the engine attempts to rock on its mountings. An engine tie-bar is fitted but when the bushes become worn the exhaust pipe eventually fractures, either at the manifold joint or at the bracket at the gearbox.
On pre-1964 cars, the remedy is to fit pairs of special cones, which are obtainable from most accessory shops stocking Mini gadgets, to the tie-bar bushes. The trouble is not likely to occur on later cars nor was it experienced on Cooper models, which have different mounting arrangements.
Finally, if you have an early model which is not fitted with the sixteen-blade fan, a lot of engine noise can be eliminated by substituting the latest pattern. It costs about £1, but you will have to remove the radiator in order to fit it.
Jacking the Car
Three different types of jack are used on the range of models. First, there is the screw-type, which fits into a socket approxi¬mately at the mid-point of the body sill, allowing each side of the car to be lifted with the front and rear wheels clear of the ground. Some of the earlier jacks caused alarm and despondency by buckling as soon as a load was placed on them but the sturdier replacements should not give trouble, provided that the jacking bar is inserted fully into the bracket. If this is not done the jack will be damaged and the bracket distorted.
If the sealing plug has been lost, it may be necessary to clear any accumulation of mud or grit from the socket to allow the projection on the jack to be pushed fully home. Fit a new plug at the first opportunity. If water is found on the floor of the car after driving in wet weather, make sure that one of the rubber plugs is not missing. The water can find its way into the hollow body sill and from there into the car.
The jack should lean outwards slightly at the top to allow for the tilting of the car as it is raised. To allow the central screw to be turned by the wheel-brace, it will be necessary to leave the door of the car open, which can be decidedly unpleasant for passengers in cold or wet weather. More-over the open door can, on occasion, constitute a very real traffic risk. These drawbacks may prompt some owners to carry a conventional screw-type or hydraulic jack which can be applied beneath the normal jacking point.
Never be tempted to jack at any other point, owing to the risk of damaging a body member or the underframe. Also, the situation does arise sometimes in which the desired wheel fails to leave the ground when the jack is fully extended. This calls for some redistribution of the weight in the car which will, of course, tend to pivot around the central jacking point!
Two other tips: make sure that the handbrake is fully applied and that the car is on firm, level ground. If the wheel that is to be removed is next to the kerb, make sure that there will be sufficient space to allow it to be drawn off its studs when it has been jacked-up.
When a ratchet jack is provided, a levelling bracket must be fitted to the pad on the jack, before jacking up the front wheels. The flanges of the bracket must be uppermost and its slot located over the tongue of the pad.

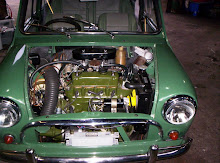
Picture: The compact engine, transmission and front suspension assembly of the standard-transmission Mini
1. Brake drum
2. Steering swivel
3. Upper suspension arm
4. Suspension unit
5. Clutch operating lever
6. Starter solenoid switch
7. Heater water tap
8. Oil filler cap
9. Ignition coil
10. Vacuum ignition-control vapour trap
11. Radiator filler cap
12. Cooling fan
13. Dynamo or generator
14. Fan and dynamo driving belt
15. Radiator drain tap
16. Universal joint
17. Lower suspension arm
18. Transmission casing (engine sump) drain plug
19. Starter motor
20. Oil filter
Place the jack under the front crossmember on the side on which the wheel is to be lifted, as close as possible to the front flange. When a rear wheel is to be raised, the levelling bracket is not needed. Instead, the tongue of the jack must be engaged with the socket on the rear face of- the crossmember.
The third form of jack is the type in which the jacking arm is pivoted on a strut and is moved forward by turning a ratchet handle. First raise the head of the jack until it is in contact with the front or rear crossmember, on the side on which the wheel is to be raised, with the tongue of the jacking pad behind the front crossmember or engaged with the socket provided on the rear face of the rear crossmember, as the case may be. The pad can be raised quickly into position by rotating the milled nut on the end of the jacking screw. Fit the ratchet handle with the word "Raise" outwards and operate it to lift the wheel. To lower the wheel, take off the ratchet handle and reverse it so that the word "Lower" faces outwards.
Fig. 1. How it all began. An early Mini undergoing extensive tyre tests with the Dunlop test team. The operator is measuring the temperature of the front tyre treads after a spell of fast driving
It has been the experience of car manufacturers that a large proportion of drivers in the "family car" class neither require nor appreciate a full set of instruments. Consequently, on the less-expensive models the instruments have been reduced to two essentials, the speedometer and the fuel gauge. A green warning light ensures that any failure of the engine lubrication system will not be overlooked, and a red warning light similarly draws attention to failure of the dynamo to charge the battery and also reminds a forgetful owner not to leave the ignition switched on when the engine is not running. The functions of both these important warning lights will be discussed in more detail later. An owner who likes to have a more comprehensive set of instruments will be interested in the special instrument panels obtainable from accessory shops or the neat Smith's instrument sub-panel which can be mounted beneath the lower edge of the facia panel and which will carry two instruments from the Smith's 2-in. range: for example an oil-pressuregauge, water-temperature gauge, an ammeter; or one of these gauges paired with a dual gauge (oil-pressure and water-temperature, for example) thus giving three additional gauges. Provision is also made on the panel for an electric cigarette lighter.Ignition and Charging Warning Light. The red warning light incorporated in the speedometer dial should glow as soon as the ignition is switched on and when the engine is idling but should fade out when the dynamo begins to charge as the engine is speeded-up. If it continues to glow at normal running speeds, check for a slack or broken dynamo driving belt, especially if the light comes on suddenly during a spell of fast driving. As the belt also drives the fan and water pump, the sudden lighting-up of the warning lamp can enable one to spot the trouble before overheating occurs.
The Missing Starting Handle
A retrograde feature of the Minis which they share with many other modern cars is the lack of a starting handle. Most do-it-yourself owners will regret the absence of this useful item when carrying out many servicing jobs. A starting-handle kit is available which can be fitted by any owner who has an electric drill and is able to handle simple tools. This conversion will be dealt with in a moment, but in the absence of a starting handle what is the best method of turning the engine?
When it is simply a matter of making adjustments, the best plan is to remove the sparking plugs in order to relieve the pistons of compression pressures and to turn the engine by pulling on the fan belt. An alternative scheme when a manual gearbox is fitted is to turn the steering wheel to full right lock, jack up the offside front wheel, engage top gear and rotate the engine by turning the road wheel. Some owners adopt this method, as a last resort, to start the engine when the battery charge is too low to turn the starter motor but sufficient current remains to operate the ignition system. In such a case a quick twirl of the front wheel, after switching on the ignition and setting the mixture control, will usually produce a start but do make sure that the handbrake is applied really firmly and that the jack is secure. If the car should topple off the jack after the engine has been started the results might be disastrous!
The starting-handle kit just referred to is made by Oselli Engineering, Industrial Estate, Stanton Harcourt Road, Eynsham, Oxon. It is ingeniously arranged so that the handle can be inserted when the left front wheel is turned to full lock. It is necessary to cut an opening in the wheel valance and to bolt two guide plates in place to position the inner end of the handle. A bracket, bolted to the front suspension, steadies the outer end of the shaft. The only other job to be done is to unscrew the crank shaft-pulley securing bolt and substitute the starting-handle dog bolt, which is also provided in the kit.
On later models on which the starter motor is controlled by the ignition key, through a solenoid (electro-magnetic) switch in the engine compartment, it is possible to use an ingenious device known as the ETT 80A Junior Autopoints Unit, which was obtainable at the time of writing from Eldred Motors and Electronics Ltd., 15a Lincoln Road, Hull, E. Yorks. When this is connected-up to the battery and starter solenoid switch, the engine can be "inched" round at the slowest possible speed, making precise adjustment an easy matter.
The device is not expensive and if you intend to carry out home maintenance as a regular rule, it will soon repay its cost, as it can also be used to set the basic ignition timing, check the actual firing point of the engine, check the condition of the starter ring gear and for other purposes which are described in the instruction leaflet which accompanies the unit.
Interior Heater

The earlier type of heater, fitted as standard on deluxe models and available as an optional extra on the remainder of the range, is of the simple recirculating type rudely termed a "fug-stirrer" in some quarters since it draws in and recirculates the air inside the car, instead of drawing in a fresh supply from outside. In hot weather the fan can be used for cooling purposes if the water supply to the heater is turned off by the tap at the hose connexion on the engine. Later heaters are of the fresh-air type and the tap is controlled from inside the car.
The fan motor will operate only when the engine is switched on. The initial movement of the switch brings the motor into operation at full speed. Further rotation reduces the speed (and the noise of operation) until the desired amount of heating and demisting is obtained.
Windscreen Wiper Switch:

The wiper blades are not self-parking on earlier cars. It is, therefore, necessary to switch off the wipers at the moment at which the blades reach the parked position.
Oil-pressure and Filter Warning Lights
Of equal importance is the green oil-pressure warning lamp which is fitted when an oil-pressure gauge is not provided. Like the ignition warning lamp, this should be extinguished as soon as the engine is running, as the contacts on the switch mounted on the engine are designed to open when the oil pressure in the lubrication system exceeds 5- 81b per sq in.
If the lamp continues to glow, the car should not be driven until the oil level in the sump has been checked. If all appears to be in order, and there is no sign of external leakage or clatter from the engine when it is cautiously speeded up, it is possible that the oil pressure-operated switch is faulty. Most garages will be able to test the switch and to check the pressure in the lubrication system by connecting a pressure gauge to the switch union. The normal running pressure is 40-70 lb per sq in.
On later models a second oil warning lamp is provided, which lights up only when the oil filter element is becoming clogged and is due for replace¬ment. The increased resistance caused by a dirty filter operates a switch on the filter housing.
Choke or Mixture Control. This control should be pulled out fully when the engine is started from cold but should be progressively returned as the engine warms up and is able to accept the weaker mixture without spitting-back or stalling in traffic. Keeping the mixture control in action

Fig. 3. The Riley Elf Mark III saloon. The Wolseley Hornet is very similar, apart from the radiator grille
too long will cause excessive fuel consumption and rapid cylinder wear.
On the other hand, since the carburettor is set to give an economical mixture strength when the engine is at its normal running temperature, misfiring and lack of power may be experienced if the mixture control is pushed home too soon after starting from cold; but the car should respond normally to the throttle after two or three miles have been covered, even in very cold weather. If it is necessary to keep the mixture control in use, carburettor adjustment, as described in Chapter 6, may cure the trouble. At the same time, check that the damper piston chamber in the carburettor is filled with the correct grade of engine oil.
Normally there should be no need to use the control when starting a warm engine; in fact, if the control is pulled out when the engine is hot, starting may be difficult or impossible, owing to the whole of the induction system being filled with an excessively rich petrol-air mixture. In such a case the only cure is to push the mixture control fully home, open the throttle wide and rotate the engine with the starter motor until the rich mixture has been cleared out of the cylinders. As soon as the engine fires, the throttle should be closed to prevent it racing.
The Instruments and Controls
If the driving belt appears to be sound and correctly tensioned, failure of the lamp to be extinguished indicates a fault in the charging circuit, either in the dynamo, control box or wiring, which should be investigated at the earliest possible opportunity by a specialist. The reserve of current stored in the battery can be exhausted comparatively quickly, particularly when driving at night even if one forgoes the luxury of keeping the heater or radio in operation.
If the light does not glow when the ignition is first switched on, it is obviously essential to check the bulb in the warning lamp and renew it if necessary, or to trace and put right the fault in the circuit.

Fig. 2. The oil-pressure-operated warning light switch (1). The micrometer ignition-timing adjuster (2) is also shown
Lubrication Equipment
Only two further items are necessary when lubrication is carried out at home. If an inspection pit is not available, a pair of wheel ramps will be required to provide adequate clearance for lubricating the front suspension, steering and the drive shafts, handbrake cables, draining the sump, and, incidentally, servicing the petrol pump.
Although the ordinary type of grease gun is quite efficient the side-lever type of gun is to be preferred. It enables a very high pressure to be developed with little effort, and has also the advantage of being fitted with a long extension tube, which makes it easy to reach less accessible points, and a snap-on hydraulic connector which provides a perfect seal without the need for applying pressure against the nipples.
These items will render the owner virtually independent of a service station, and their cost will probably be more than recovered during the first few months of home servicing.
A large-scale lubrication chart, printed on stout paper and suitable for hanging on the garage wall, is always an asset. It is worth recording that such charts, covering a very wide range of cars and models in addition to those covered by this book, can be obtained free of charge from the Castrol Chart Library, Castrol House, Marylebone Road, London, N.W.I.
Workbench and Storage
A workbench will be needed for any jobs that are not done in situ on the car, but is by no means essential if the work is confined to simple routine servicing and adjustments. It is quite possible to make do with a stout kitchen table, which can often be picked up for a few shillings at an auction.
Again, if any but elementary servicing is carried out, it will be necessary to obtain an engineer's vice, which should be securely bolted to the bench, reinforcing the top, if necessary, at this point. Excellent vices can often be obtained quite cheaply from stores dealing in Ministry surplus equipment.
Shelves can be fitted beneath the bench or to the wall, to accommodate the inevitable collection of tins, jars and bits and pieces that will accumu¬late from time to time. Small steel parts can be kept in jam jars filled with a fifty-fifty mixture of paraffin and engine oil, to protect them from rust. A wooden stand can also be made up to take a 5-gallon drum of oil as it is much more economical to purchase oil in bulk than in pint, quart or gallon tins. A draw-off tap can be purchased quite cheaply to replace the screwed plug in the side of the drum. Needless to say, when fitting the tap the drum should be laid on its side, with the screwed plug uppermost.
Tools and Equipment
No job can be done properly if the correct tools are not available. Unfortunately, manufacturers of popular cars seldom include any but the bare minimum of items in the tool kit and it will therefore be necessary to purchase one or two items to supplement the selection of screwdrivers, pliers and so forth that the average home handyman will usually have accumulated over a period of years.
Spanners are particularly important, if any but the most elementary servicing is to be done. It must be remembered that "Unified" screw threads are standardized on these models and that nuts and bolts of this type call for the use of American spanner sizes (usually termed S.A.E. spanners). If you have a legacy of Whitworth spanners from an earliercar, do not be tempted to use them on Unified nuts. They may appear to be a reasonably good fit but there is a risk of damaging the corners of the hexagons if any stress is applied. It will be necessary to purchase a set of good-quality double-ended spanners in a range of sizes from, say TV in. to
in. A/F ("across the flats"), which will fit Unified nuts in sizes from i in. to & in.
Ring spanners are to be preferred, although one or two slim-jawed open-ended spanners may be required for the occasional awkwardly-placed nut. Better still is a set of socket spanners. If these are provided with an extension drive and, possibly, a ratchet handle, so much the better.
A medium-sized adjustable spanner will often come in handy but it should be used for holding, rather than turning, nuts and bolts. Always use a proper spanner whenever possible.
Before leaving the subject of spanners it should be mentioned that a B.S.F. nut should not be forced on to a Unified thread or vice versa. When buying replacements, make sure that these are of the Unified type; if these are not available, American National Fine (A.N.F.) threads are interchangeable, for all practical purposes, with Unified threads.
Next and equally important comes a set of feeler gauges. The small plug-gap and contact-breaker feelers provided in the tool kit may serve in an emergency but a combination set of feelers, which can be purchased quite cheaply from most accessory houses, enable adjustments to be carried out more accurately and more conveniently. A set of feelers is, in any case, essential when adjusting the valve rocker clearances. For the sparking plugs, however, wire-type gauges are preferable. These can be obtained in sets which incorporate a gap-setting tool which eliminates any risk of damaging the sparking plug electrodes, as described in.
A good tyre-pressure gauge is also a worthwhile investment, as it is seldom wise to rely on pressure gauges used by garages. In the first place, these are not always as accurate as they should be; and secondly, pressures should always be taken with the tyres cold, and this is obviously impossible if the car has to be driven to a garage or if pressures are checked during the course of a journey. The inexpensive telescopic type of gauge will serve quite well, provided that it is kept free from grit and protected against knocks. Better still, one may take a tip from rally and competition drivers and spend a little more on a dial-type gauge, which gives clearer and more accurate readings.
If one is starting from scratch it will be necessary to purchase a selection of screwdrivers, including one with a small blade for electrical work. The most economical plan is to buy a set, consisting of a handle and several interchangeable blades, fitted in a plastic wallet. Make sure that the set contains two different-sized Phillips screwdrivers to fit screws having cross-shaped recesses in their heads. A pair of side-cutting pliers and also the tapered, round-nosed type, will be needed, as will a ball-pane engineer's hammer and (although this is not essential) a hammer having both copper and rawhide striking faces, which will enable recalcitrant components to be dealt with without the risk of damaging machined surfaces.
An electric drill of the home-handyman type is, perhaps, something of a luxury, but the way in which it can speed-up a surprisingly large number of jobs, particularly if it is provided with the usual range of accessories, such as wire brushes for use in decarbonizing the cylinder head, a grind stone and a lambswool polishing mop, renders it a really worthwhile investment for an owner who carries out any appreciable amount of work.
Subscribe to:
Posts (Atom)