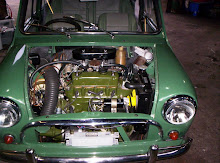
If the warning light provided on later models (see pages 4 and 5) glows before the recommended mileage has elapsed, the filter should be changed within the next 300 miles.
If an early filter change has been carried out, however, and only a thousand miles or so have elapsed before the normal 6,000-mile service falls due, there will be no need to change the filter again at this service; it can be left to run its full 6,000 miles, unless the warning lamp lights up after a shorter period.
Normally, the filter casing is removed by working from beneath the car, but it is easier to remove the radiator grille. This is necessary, in any case, when changing the horizontally-mounted filter on automatic-transmission models. Shops which sell Mini accessories can usually supply two special retaining nuts which allow the grilles on most models to be removed quickly and easily a worthwhile modification for the owner who does his own servicing, as it also makes it easier to work on the ignition distributor.
Before removing the oil filter, clean the exterior of the casing as thoroughly as possible before removing the central retaining bolt. The filter retaining bolt can then be unscrewed, holding a tin beneath it to catch the oil which will drain from the filter as the bolt is withdrawn. The casing can then be removed.
The new element will be supplied complete with new sealing washers. Although most instruction manuals, and the leaflet enclosed with the element, recommend that the sealing washer in the casting, against which the upper edge of the filter bowl seats, should be renewed, it is a tricky job to fit the new washer evenly into its groove.
If the old washer appears to be in good condition, therefore, it is best to leave well alone. Only if an oil leak becomes apparent when the filter is reassembled and this cannot be corrected by slackening the bolt and repositioning the filter, should the washer be renewed. To do this, the simplest plan is to remove the filter bracket from the crankcase by undoing the oil pipe connexion and the two retaining screws. If the gasket between the flange of the bracket and the crankcase is damaged, a new gasket should be fitted at this point.
Assuming that a straightforward exchange of the filter element has been carried out, however, the filter bowl should be thoroughly cleaned before the new element is inserted and the small felt washer must be positioned between the element pressure plate and the metal washer above the pressure spring. To ensure correct oil filtration it is particularly important that this washer should be in good condition and a snug fit on the central securing bolt. After the bowl has been manoeuvred into position beneath the bracket and the central securing bolt inserted, hold the head of thebolt up against the bowl and fill the bowl with oil to ensure that oil will reach the bearings as soon as the engine starts. For the same reason, do not operate the starter while the filter is off or the sump empty, as this will empty the oil pump and the oilways, possibly resulting in considerable delay in building up pressure when the engine is restarted.
As soon as the engine is running, examine the filter for leakage. A very pronounced oil leak will occur if the bowl is slightly displaced and does not seat squarely on the sealing ring.
Showing posts with label changing. Show all posts
Showing posts with label changing. Show all posts
Sunday, 18 October 2009
Changing the Oil Filter
Changing the Engine Oil
The engine oil becomes contaminated with carbon and other products of combustion, including condensed water and fuel, and must, therefore, be drained out at least at 6,000-mile intervals for cars fitted with standard transmissions and at 3,000-mile

Fig. 10. The oil-pressure relief valve
intervals for automatic-transmission models. If the engine is worn, the degree of gas leakage past the piston rings may make it advisable to change the oil more frequently; for example, at 3,000 miles for standard-transmission models and, say, 1,500 miles when an automatic transmission is fitted. Also, more frequent changes are advisable when most of the driving is done in cold weather, particularly when frequent starts are made from cold and when the engine is allowed to idle for long periods. At the other extreme, in hot, dusty conditions the oil will deteriorate more quickly than in temperate climates. Under adverse conditions it may be advisable to change the oil as frequently as every 1,000 miles. If in doubt, consult your local B.L.M.C. dealer.
The oil should be drained when the car has just come in from a run; being hot, it will be more fluid and will be holding in suspension the impurities. At the same time the oil filter element should be cleaned or, preferably, renewed.
If a modern premium oil is used, it should not be necessary to flush out the sump with flushing oil, as was often recommended with older types of car. As the sump may contain up to nine pints of oil, a sufficiently

Fig. 11. The engine oil filter. Above, as fitted to manual-gearbox models. Below, the filter used when an automatic transmission is fitted. The rubber seal, 1 ; felt seal, 2, and the rubber ring, 3, must be in good condition

large drain pan should be provided. An old kitchen washing-up bowl will serve admirably. Sufficient time should be allowed for the oil to drain completely before the drain plug is replaced. The sump should then be refilled until the level is up to the "full" mark on the dipstick.
While the oil is draining, examine the drain plug. This is unusual, as it incorporates a magnet which will attract and hold the minute iron and steel particles that must inevitably be worn off the gears, and which might otherwise damage the engine if the oil filter were allowed to become clogged to such an extent that the filter by-pass valve opened.
Subscribe to:
Posts (Atom)