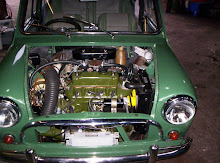
The oil level should be checked with the car standing on level ground. A few minutes should be allowed for oil to drain back to the soimp to prevent a misleadingly low reading being shown. Remove the dipstick, wipe it, return it and push it fully home before withdrawing it to check the level. It is more economical to keep the sump well topped-up than to allow the level to fall to near the danger point, at the end of the dipstick, before restoring the level.
Sunday, 18 October 2009
Grease-gun Lubrication
The most suitable lubricant to use in the grease gun is one of the modern multi-purpose lithium-based greases, which are suitable not only for the steering connexions, swivel pins, propellor-shaft nipples, brake cables and pivots, but which also should be used for packing the rear wheel hubs. If it is blended with molybdenum disulphide, so much the better.
Each grease nipple should be wiped before the gun is applied, to avoid any risk of grit being forced through the nipple into the bearing.
If the nipple is dented or otherwise damaged it is a simple matter to unscrew it and fit a replacement, which can be obtained from a B.L.M.C. dealer. In an emergency, however, it is possible to obtain a satisfactory seal, even on a damaged nipple, if a piece of cheesecloth or other light fabric is first placed between the nipple and the end of the grease gun.
Many owners are unaware that every lubrication nipple contains a small spring-loaded ball valve which prevents the grease from escaping from the bearing. If a "worm" of grease exudes from the nipple when the grease gun is removed this valve is not functioning correctly and it is advisable to renew the nipple as soon as possible.
It is an advantage when greasing each steering swivel to jack up that side of the car until the front wheel is clear of the ground. This will allow grease to reach the thrust faces of the bearings that carry the weight.
Early in the life of the Mini the greasers on the inboard propellor-shaft splines, which were difficult to reach, were rendered unnecessary by packing the joints with a special long-life grease. The lubricator on the gear linkage, at the back of the engine, now qualifies as the only nipple which is rather inaccessible but the latest recommendation is that the linkage needs lubrication only at major overhaul periods, unless unusual stiffness develops in the gear change.
A further example of improvement in servicing is the substitution of nylon ball cups for the metal-to-metal type previously used at the ends of the steering tie rods. The later design of joint does not require lubrication and is not therefore fitted with a grease nipple.
Having disposed of the general aspects of lubrication one can now turn to one or two points that deserve a little clarification when tackling the jobs listed under the various mileage headings in the Maintenance Schedule.
When the Oil Warning Light Glows

The oil-pressure switch on the crankcase normally opens when the pressure in the system exceeds 5-8 lb per sq in., so that the green warning light should be extinguished whenever the engine is running. If the light continues to glow or suddenly comes on at normal running speeds, the cause (apart from a faulty pressure switch, which is a possibility that cannot be entirely ruled out) is either a dangerously low oil level in the sump or loss of pressure at some point in the system.
If an oil pressure gauge and adaptor are substituted for the switch, a pressure of at least 40 lb per sq in. should be recorded when the engine is thoroughly warmed-up and running at a fairly fast speed; about 15 lb should be shown at idling speed. Incidentally, it is possible to fit an oil gauge and at the same time to retain the warning light if the oil-pressure switch is replaced by a special oil-filter adaptor, to which the pressure gauge pipe can be connected.
Assuming that the sump is full and that the correct grade of oil is used, low oil pressure can be caused by a choked intake in the sump, a faulty oil-pressure relief valve or a worn pump.
Fortunately the pump is seldom at fault (except when the engine has covered a very large mileage). The oil-pressure relief valve is, however, a possible culprit. This valve, which opens at 70 lb per sq in., relieves the excessive pressure that would otherwise be developed in the system when the oil is cold, is retained by a hexagon plug beneath the oil-pressure switch (see Fig. 10). The valve should be removed and cleaned. The seating in the cylinder block should also be cleaned with a lint-free cloth wrapped around the end of a length of wood. If the strength of the spring has weakened a new spring should be fitted. The valve is not adjustable.
If satisfactory pressure is not restored when the above points have been attended to, the crankshaft and connecting-rod bearings are probably badly worn.
Engine and Transmission Lubrication
On conventional cars the engine oil has only to lubricate the engine itself. The gearbox and the final-drive gears in the rear axle have their own supplies of lubricant which, unlike the engine oil, are not subjected to extremes of heat, dilution by condensed fuel and contamination by carbon particles and by acid moisture. On the Minis, however, the engine, "gearbox" and final-drive gears share a common supply of oil, since all the gears and the differential are carried in the crankcase beneath the crankshaft.
It should not be necessary to emphasize, therefore, that "cheap" oils are likely to be the most expensive in the long run. Similarly, any temptation to delay oil changes beyond the recommended mileage is likely to result, sooner or later, in "expensive noises."
This is particularly important when an automatic transmission is fitted. Other types of automatic gearboxes normally call for the use of a special fluid but extensive tests have shown that normal engine oil can be used satisfactorily in the Mini automatic transmission provided that the oil is changed regularly at 3,000-mile intervals and that the oil filter is renewed at least at 6,000-mile intervals and more frequently if the warning light glows. After the specified mileage, changes begin to take place in the engine oil which alter the friction characteristics of the clutches and epicyclic brake bands in the transmission, upsetting the smooth operation of these units.
Owners of new Minis are sometimes worried by heavy oil consumption during the first few thousand miles. Oil may disappear at the rate of a pint in every 150 miles but experience has shown that after about 3,000 miles the piston rings should have bedded-in and the consumption should drop to a much more reasonable figure. By the time that about 5,000 miles have accumulated, for example, it should not exceed about 500 miles to the pint, although Mini-Cooper engines arc rather more thirsty if they are driven hard. Early Coopers, incidentally, gained a reputation for very heavy oil consumption but modifications which were incorporated in later versions reduced their appetite to a more acceptable figure.
Owing to the fact that the engine is not shielded by a warm radiator from the flow of air through the front grille, a good deal of sludge tends to form on the valve rocker gear and inside the rocker cover. This can be prevented by drilling two ,?, in. holes in the oil filler cap; but do not do this if a special crankcase ventilation system is fitted . It also helps to blank off the grille during the winter months.
Lubrication
Effective lubrication can be summed-up as the use of the right kind of lubricant, in the right quantity, in the right place and at the right time. Armed with the diagram on page 19, or, better still, a large-scale Castrol wall-chart , even the novice would find it difficult to go far wrong. There are, however, a number of "whys" and "wherefores" which are worth explaining in a little more detail and some practical tips which will enable certain jobs to be carried out more effectively and may forestall trouble at some future date more especially in view of the unorthodox construction of the Minis.
The equipment which will be required when lubrication is to be carried out in the home garage has already been described. We can begin, therefore, with the all-important subject of lubricating the combined engine and transmission unit.
Saturday, 17 October 2009
Crankcase Ventilation System

On later models a special crankcase-breather system is fitted. The engine fumes are drawn from the crankcase, through aflame-trap and a ventilation valve, into the inlet manifold. The valve regulates the flow of air and fumes into the manifold, thus preventing excessive weakening of the mixture when the engine is idling. Clean air is drawn into the engine to replace the fumes, through a filter which is incorporated in the oil filler cap. This cap should be renewed as a complete assembly after 12,000 miles in service, or earlier if it becomes clogged.
To test the system, take off the oil filler cap when the engine is running at idling speed, at normal operating temperature. If the valve is functioning correctly the engine will speed-up by approximately 200 r.p.m. (which represents an audible change in engine speed) when the cap is removed.
If there is no change in the idling speed, remove the spring clip from the ventilation valve and dismantle the valve as shown in. Clean the metal parts with petrol. Hard deposits on these parts can be softened by dropping the parts into boiling Vater for a few minutes.
The diaphragm must be in good condition. If in doubt, replace it. Do not stretch or distort the spring. When reassembling the valve, make sure that the metering needle is correctly centred and that the diaphragm is seating properly before refitting the cover and spring clip.
The Thermostat
Although the thermostat which regulates the cooling water temperature vitally affects engine efficiency it is often overlooked and seldom checked. As can be seen from Fig. 16, it consists of a valve, fitted at the water outlet from the cylinder head, that prevents circulation of water to the radiator until the normal running temperature is reached.
The bellows, filled with wax or a volatile liquid, begins to expand at a temperature of 82°C, in the case of the standard model. An alternative thermostat which opens at 88°C can be substituted during cold weather. The higher opening temperature of the latter improves the efficiency of an interior heater and can also cause an appreciable improvement in fuel consumption during winter driving. A thermostat which opens at 74°C is available for use in hot climates.
Thermostats, of course, are not infallible and if overheating occurs, or conversely, if the engine is slow to warm-up, it is logical to check this item. Remember, however, that overheating can be caused by a number of other faults, among which deposits of rust and lime scale in the cylinder head and radiator water passages are the most likely. Shortage of oil or water, obstructed air passages in the radiator, over-retarded ignition and severe pinking will also cause the trouble.
The thermostat can be lifted out after the water outlet elbow has been removed. When cold the valve should be tightly closed. If it is open, either the bellows is punctured or the stem is jammed by an accumulation of lime deposits.
If the thermostat appears to be serviceable, it should be tested by immersing it in a pan of water which should be brought nearly up to boiling point. If a suitable thermometer is available the opening temperature should be checked while moving the thermostat about in the water to ensure even heating; the temperature will, of course, depend on the type of thermostat fitted, as described above. If the valve has not opened when the water begins to boil a replacement thermostat should be fitted. Before refitting a used thermostat make sure that llie small air-release hole in the valve is not choked; otherwise an air-lock is likely to occur when the cooling system is refilled.
Subscribe to:
Posts (Atom)